

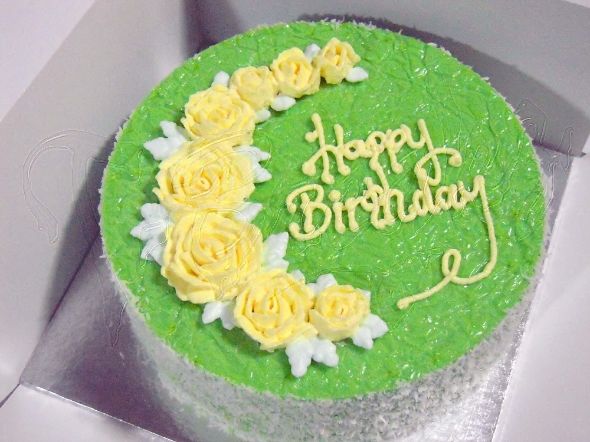
After a month of research & practice, finally I succeeded in creating the double happiness (as what my SIL calls it) for the men in the family. It's not perfect but I'm very satisfied with my work.
The upcoming cakes will be much better (hopefully!) and I shall be one step closer to achieving my dream! V^_^
The upcoming cakes will be much better (hopefully!) and I shall be one step closer to achieving my dream! V^_^
 Before I go on to the recipes for this cake, let me share a lil history about it.
Our family always celebrate Dad's & Bro's birthday together as their birth dates are only about a week apart.
For this year (onwards) since I will be the one in charge of baking (desert department), they have asked for their cake to be of their favorite colour; orange for dad & red for brother. I could have just coloured the cakes accordingly but that would be plain B-O-R-I-N-G!
And so after coming out with so many designs
Dad's Cake: Condensed Milk Pound Cake
Ingredient
160g butter
40g sugar
2 tsp vanilla essence
1 cup condensed milk
240g cake flour
2 tsp baking powder
4 eggs
Method
2 tsp vanilla essence
1 cup condensed milk
240g cake flour
2 tsp baking powder
4 eggs
Method
1. Line 7" round pan with parchment paper and preheat oven to 140°C
2. Sift flour and baking powder together and set aside
3. Using an electric mixer with the paddle attachment, cream butter and sugar till light and fluffy. Scrap down the sides and bottom.
4. In a small bowl, whisk condensed milk with vanilla essence and add in to the butter mixture (bit by bit to prevent curdling), mix till incorporated
5. Stop to add flour and mix it in low speed (also bit by bit to prevent the flour from flying all over). Scrap down the sides and whisk till the batter is smooth and not lumpy.
6. Add in the eggs, 1 at a time, whisk well.
7. Halve the mixture and separate it into 2 different bowls. Add desired colour (I was using orange and yellow).
8. Scoop 1/2 cup of the yellow mixture onto the center of the prepared pan and 1/2 cup of the orange mixture on top of the yellow mixture. Repeat till both mixtures left with half.
9. Repeat with the above step but reduce the scoops to 1/4 cup. Reduce the scoops gradually until the mixture finish. The circles will become smaller each time. (Refer to Note D)
10. Bake at 140°C for 1 hour or until a satay stick inserted in the center of the cake comes out clean. Cool the cake in the pan for 10 minute on a wire rack.
11. Using an offset spatula, run it around the cake before inverting it on the wire rack to completely cool. After the cake is completely cool, wrap it in a cling wrap and refrigerate it for at least 1 hour or overnight. (This is done to make assembling and frosting the cake easier)
Additional Notes
A. Please view the original recipe in Rei's blog as the above recipe has been tweaked according to my own preference
B. I used Buttercup for the butter. Not sure if it's considered as good quality but so far all my baked products turn out ok.
C. The reduce in temperature (140°C instead of 170°C) is due to my oven being a convection oven (the kind with a fan inside)
D. For those who don't understand Step 6 & 7, refer to Jo's Deli & bakery or Sue Aleen's Foods & Recipes
E. Oven configuration for Tefal Activys OV1002: Bottom heat with fan @ shelf position 3
Brother's Cake: Red Velvet Cake
View the recipe here. For this time round, I halved the batter as I'm only making half of my cake red.
Buttercream
Buttercream
Ingredient
150g butter
1/4 tsp vanilla essence
Method
1. Sift icing sugar to remove the lumps
2. Using an electric mixer with a paddle attachment, cream butter and sugar till light
3. Add in vanilla essence and whisk till smooth. Add in desired colours.
Logo
The logos are made of milk & white chocolate using frozen buttercream method. View how to make frozen buttercream here.
Assembling Double Happiness
1. Using a serrated knife, cut both cakes into half. Level and tort the cakes until you get the height.
2. Place the first layer of the red cake on the cake board and spread the cream cheese frosting on the top (thickness of frosting depends on individual). Spread a thin layer of frosting on side (this is to join the orange cake and hold it together).
3. Place the first layer of the orange cake on the cake board and join it with the red cake. Spread a thin layer on frosting on top (this is also for joining purpose).
4. Repeat Step 2 & 3 for the second layer. Crumb coat the cake and refrigerate for at least 1 hour before applying the final frosting and decorate.